

Right this moment y’all are in for a particular deal with! Discover ways to make a classy and sensible DIY apron that won’t solely defend your garments (or your youngster’s garments) but additionally showcase your distinctive fashion. This step-by-step information will reveal the secrets and techniques to creating an apron that matches completely round your waist and requires minimal stitching abilities. There’s even a no-sew model. Get able to impress your family and friends together with your fashionable and practical do-it-yourself apron!
I’ve permission to reprint a enjoyable DIY mission from Lazing on a Sunday Crafternoon: Little Initiatives for Individuals with Only a Little Time and a Little Talent (Allen & Unwin, affiliate Amazon hyperlink) by Eliza Muldoon. This ebook of 52 concepts for an entire yr’s value of Sunday crafting requires solely primary abilities and makes use of easy home items. It is stuffed with nice tasks which can be may be performed by your self or together with your youngsters. I like helpful issues so I requested permission to reprint the craft on the best way to make a baby’s apron. I feel you’ll love Eliza Muldoon’s DIY youngsters apron- it’s so cute and would make an cute DIY reward in addition to a extremely helpful merchandise for youngsters to have whereas crafting or serving to within the kitchen.
Simple DIY Apron
Calling all artwork and craft lovers and residential cooks! This text is your go-to information for making a easy but fashionable half apron. Don’t fear if you happen to don’t possess superior stitching abilities or don’t personal a stitching machine. This text will stroll you thru the method of making a wonderful DIY apron utilizing easy supplies and methods. Whether or not you’re a newbie or an skilled DIYer, you’ll be amazed at how simply you’ll be able to unleash your creativity and make a novel apron for your self or as a considerate reward for somebody particular.
A DIY waist apron is each practical and trendy. With just some easy steps, you’ll be able to rework odd material into a classy apron that can hold your garments clear as you’re employed. An apron is very nice for teenagers, who’re at all times wiping their fingers on the shirt or pants in any other case! This apron tutorial can be utilized to make an grownup apron or a child’s apron. You simply regulate the width of the apron to suit the individual. There’s a whole lot of leeway because it has ribbons that tie so it may be gathered up tighter or let loose looser.
This straightforward DIY tutorial will information you thru the method of making a waist apron that not solely protects your garments from stains but additionally provides a contact of aptitude to your craft and culinary adventures. The primary part requires primary stitching abilities or you’ll be able to skip to the no sew model beneath it.
reprint beneath (craft #12 from the ebook)

How To Make Apron
I’ve been fortunate sufficient to find a number of cute classic aprons these days. I solely want them annually once I educate artwork as remedy, however once I see a hand-embroidered and trimmed apron in an a second hand store, how can I simply depart it there? Nevertheless, I haven’t discovered any youngsters’ ones, so I assumed I’d make an apron for my daughter. There do appear to be a whole lot of little aspiring cooks round in the intervening time.
Thought and inspiration
I like dress-ups and the way simply youngsters can placed on an apron and spend the following half hour making ready meals, or how they placed on ‘Janey socks’ and break into dance strikes. I attempt placing on tracksuit pants within the hope that it’ll encourage me to train—perhaps in the future.
Time taken 45 minutes
What we used for this straightforward stitching mission
- Cloth for the apron—this was a 1-m sq. piece left over from Christmas gift-wrapping
- Small piece of material for a pocket (I feel it seems to be cute to make use of completely different material for the entrance pocket.)
- An iron
- Stitching machine
- Needle and thread
- Measuring tape
- Ribbon—sufficient to go across the recipient and tie a bow on the again
Waist Apron With Pockets- Step By Step Tutorial
What I did
First the kid’s apron preparation
- To work out the scale of the apron, I measured loosely round Lotte’s hips to determine the width. For the size, I wished it to go a bit previous her knees. I settled on 85 cm extensive ∞ 35 cm lengthy, and lower the material to dimension.
- I selected a 10-cm sq. piece from my patchwork sq. stash for the pocket.

Now for the kid’s apron building
- First, I ironed a hem on all 4 sides of the apron, and sewed the hem utilizing a primary straight sew.
- Then I ironed a hem on the 4 sides of the patchwork sq., however solely stitched the hem on one aspect of the sq.. This turned the highest of the pocket piece.
- I sewed the pocket to the apron on the remaining three sides. I simply guessed the place to place it. (No surprises that it was off-centre!)
- Throughout the highest of the apron, slightly below the seam, I sewed a really free straight sew by hand and gathered as I went. I wished the gathered width to go simply round Lotte’s hips, however by this stage she’d run off so I simply guessed. It labored although.
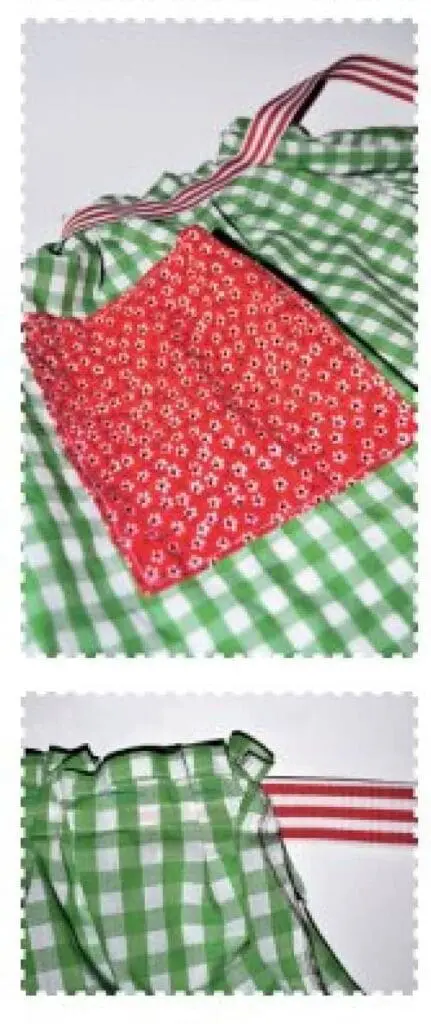
- Lastly, I sewed the ribbon throughout the gathering, hiding the white sew on the white stripe. I left a little bit of the gathering seen on the prime as a result of I assumed it seemed candy. The ribbon turns into the waist ties.
Baby’s Apron Variations
- You may make it much less flouncy by simply folding three pleats on the prime as an alternative of gathering it. To do that simply fold about 5 cm or so on the centre of the material after which add two extra folds midway alongside both aspect.
- You can add vertical seams from the underside to the highest of the pocket to make smaller sections that might fortunately maintain little utensils.
- You can make an apron on this method for grown-ups too—merely regulate the material measurements to swimsuit.
AND THE LITTLE ONE
Lotte was concerned within the material choice—I assumed her selections had been mighty cute! She didn’t stick round for the stitching, although; she was already taking part in along with her toy range and bringing me ‘baked items’. Once I gave this to her, she stated, ‘It’s so fairly. Everybody watch me run across the kitchen desk in my apron.’ (As a result of that’s what one does when one places on an apron.)
When you loved this tutorial for the best way to make a baby’s apron and also you’d like to take a look at extra DIY craft tasks, you may get the Lazing on a Sunday Crafternoon ebook at IPGBook.com and so they even have eBook editions accessible. Thanks a lot to the writer Eliza Muldoon and IPG for permitting me to reprint this craft right here.

No-Sew Model
First, collect all the mandatory supplies in your mission and produce them to your cleared work house. You’ll want a chunk of material that’s no less than 1 yard lengthy and 45 inches extensive. Select a cloth that speaks to your private style in your personal apron. Whether or not it’s a vibrant floral sample or a daring geometric design, the selection is yours. Moreover, you’ll want ribbon 1 inch extensive and 69″ lengthy, material scissors, material glue, an iron, and any ornamental components you may wish to embrace, akin to buttons or bows.
Upon getting your supplies prepared, lay the yard of material out on a flat floor. Measure and mark the specified dimensions in your new apron, usually round 18 inches extensive and 24 inches lengthy. Use material scissors to fastidiously lower alongside the marked strains, creating the bottom of your apron.
Subsequent, it’s time so as to add some persona to your apron by incorporating pockets or compartments. Including an apron pocket to the entrance of the apron not solely provides performance to your apron but additionally gives a possibility for embellishment. Think about using a contrasting material or ornamental stitching to make your pockets actually stand out. You’ll be able to even connect small equipment like buttons or bows for an additional contact of caprice.
After you’ve added your required gildings to the skirt piece, fold excessive fringe of the apron material over about 1 inch in a straight line. Safe the folded edge with material glue. This can create a clear, completed edge for the waistband of your apron. Equally, fold over the aspect edges of the material and safe them with material glue, making a neat hem.
When you’ve accomplished these steps, it’s time to connect the ribbon to the waist of your half apron. Middle the highest fringe of your apron in the midst of the ribbon and safe in place with material glue. This can create the waist straps that can hold your apron in place.
Conclusion
By following the steps outlined on this article, you now have the instruments and information to unleash your creativity and make an apron that actually stands out. With the right material combos and personalised gildings, you’ll be able to create a one-of-a-kind half apron that displays your distinctive fashion. Do you suppose you’ll use these directions for the best way to make a baby’s apron? Or will you make a waist apron for your self? I’d like to see the materials you selected in your cute apron and the way it seems. They make an important reward! Tag me @familyfocusblog!
Associated Posts:
Educating Children To Sew Can Be Simple!